Album:Electrical System:Generator Doghouse
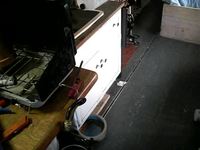
I decided to build the super-quiet doghouse for the genset, it's going to be completely enclosed with sound deadening plywood and sound insulating foam, rubber foot isolators and an baffled air intake and separate air exhaust with a remote radiator and muffler. Supposedly this should make it near impossible to hear - the doghouse isn't complete and it's already fairly quiet.
The "plans" are at the end... it actually fits quite snug using exactly the space of one side of the cargo bay and the space under the center channel. The other side of the bay is just what I needed for my massive battery bank.
 |
 |
 |
 |
|||||
 |
|||||
 |
|||||
 |
|||||
pre-attached state (minus roof) (
goes the air intake and air exhaust, plus the starter battery (
with the hole cut for the squirrel fan (
also cut, with me sneaking in. (
 |
|||||
 |
|||||
 |
|||||
 |
|||||
partially installed, showing air intake (left) and air exhaust/radiator mount (right) (
Haley takes a break. (
with the first sheet of soundproofing on the back wall. (
onto the flex exhaust pipe. (
 |
|||||
 |
|||||
 |
|||||
 |
|||||
the exhaust plumbing (minus muffler) (
welded and mounted. (
with the cargo bay door closed. (
with muffler, radiator, fuel hose and some initial wiring - it runs! (
 |
|||||
 |
|||||
 |
|||||
 |
|||||
showing squirrel cage fan/radiator exhaust and air intake (with fan wiring and starter battery hidden to right. (
The squirrel fan burns out, and I uninstall the genset to get to the squirrel fan. (
First failure that Wrico has ever seen of these things. (Note temp install of new baffle) (
attempt #1 (of three. ugh..) (
 |
|||||
 |
|||||
 |
|||||
 |
|||||
get to put up the sound insulation in the intake box (
(
(
(
 |
|||||
 |
|||||
 |
|||||
 |
|||||
minus front wall and ceiling (and a genset) (
(
scribbled out. If you actually want to reproduce this box, let me know and I'll help interpret the plans. (
measurements, for vents and radiator, plus some of my notes. (
 |
|||||
 |
|||||
 |
|||||
 |
|||||
a minimum of 4'x8' sound-deadening plywood. That stuff is expensive! (Only three sheets needed!) (
w/out finished Doghouse: Interior of bus with genset on (low load) [Video] (
w/ Doghouse: Interior of bus with genset on (low load). A huge difference! [Video] (
w/out finished Doghouse: Exterior of bus with genset on (low load) [Video] (
 |
|||||
w/Doghouse: Exterior of bus with genset on (low load). Less noticeable difference. [Video] (
|
|
|
Specs for Wrico 10kW genset
(remote radiator)
- Power
- 82A at 120V
- Dimensions
- 39.25"x21"x24" (compact version??)
- Weight
- 427 lbs
- Engine
- Kubota 4 cycle Diesel
Basic installation notes/steps for a Wrico Genset:
- mount genset
- attach radiator
- fill oil
- attach 12V to starter and to ground
- prime fuel lines (w/ elec fuel pump)
- attach fuel supply line, make sure line is switched on by tank
- Crack open top center screw on fuel filter to let air bleed
- Jumper from 1->4 (12V to Run) to start elec pump
- close top center screw once fuel comes through
- manual prime mechanical pump (up-down lever further up fuel line) until fuel flows out return Optionally open bleed screw at end of fuel line and run elec pump and prime mechanical pump until fuel flows out
- remove jumper
- attach fuel return
- fill radiator prime radiator by opening bleed screw on top of genset and squeezing radiator hose while running genset
- attach exhaust/muffler
- connect fan and 110V
- connect starter switch and/or starter/meter panel
|
|
|
Created with the tool album a script by David Madison on Thu Jan 28 03:53:38 2016